
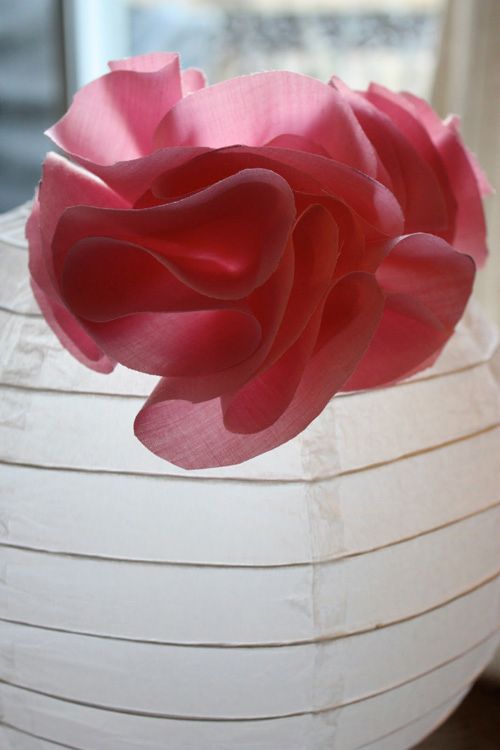
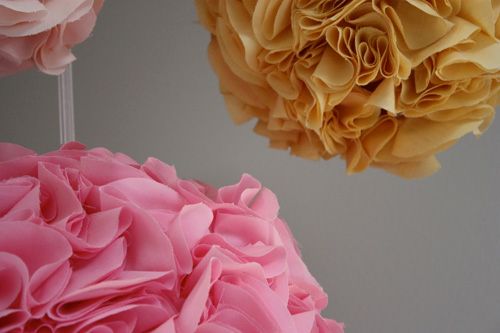
In my previous nursery post I gave you a sneak peek at my latest DIY project. I wish I could say that I brainstormed these beautiful pom poms on my own, but I actually got the idea from a wedding blog. OnceWed.com features a DIY Wedding Pom Pom tutorial that I replicated (along with their color scheme - isn't it gorgeous and perfect for a little girl's room?). Since their instructions were a bit vague, I had to do a practice run and figure out some more specific details (size of lantern, size of circle cut outs, etc) on my own.
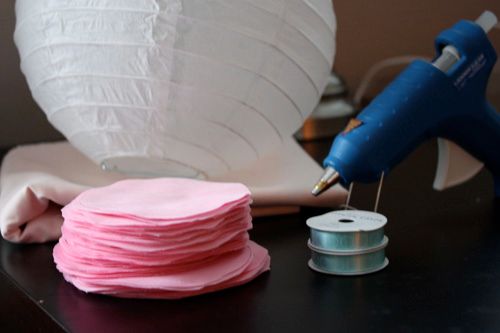
Materials needed:
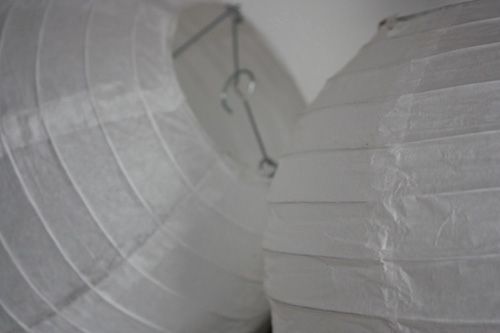
- paper lanterns (I used one 9" and two 6" lanterns)
- 2-3 yards of fabric per lantern (I used 3yd for 9" and 2yd for 6")
- glue gun
- ribbon
- a long weekend
Before I started, I printed out 3" and 4" circles and traced them onto cardboard to cut out and use as my tracing template. Once I had my fabric picked out I used my template to trace the circles along the whole piece of fabric. I was sure to put them as close together as I could so I didn't waste any fabric.
With the 4" circles I was able to get 100 circles per yard and used a full 3 yards. Obviously you get more circles with the 3" template (but I forgot to count), and also use just under 2 yards. This is where you don't want to spend a ton of money on expensive fabric. You want something light that won't be stiff when you glue or heavy when hung. I used a basic thin cotton material that cost $3-7 per yard depending what you chose. I lucked out that there was a sale going on at JoAnn Fabrics along with a 25% off coupon I had, so I purchased my fabric for pretty cheap.

Once traced, I cut out all the circles. This is probably the most time-consuming and somewhat boring part of the project. It's good to just plop on the couch and stick in a movie while you do this. I watched a Jersey Shore marathon while I traced and cut. (T-Shirt time!)
Once your circles are all cut you can begin to glue to your paper lantern. First fold the circle in half, and stick a dab of glue in the middle. Fold it in half once more to seal. Put another dab of glue at the bottom of the folded circle and attach to your lantern.
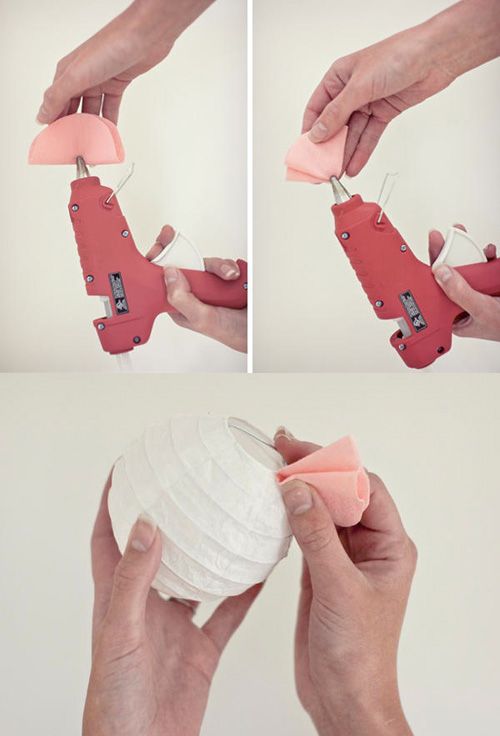
(these 3 pictures snagged from OnceWed since I had no free hands to photograph this step!)
You want to make sure you mix and match directions that you place the circles.
Continue this for a loooong time until your paper lantern is covered.
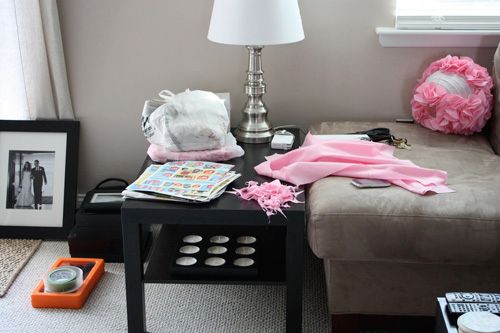
(my work area mid-construction)
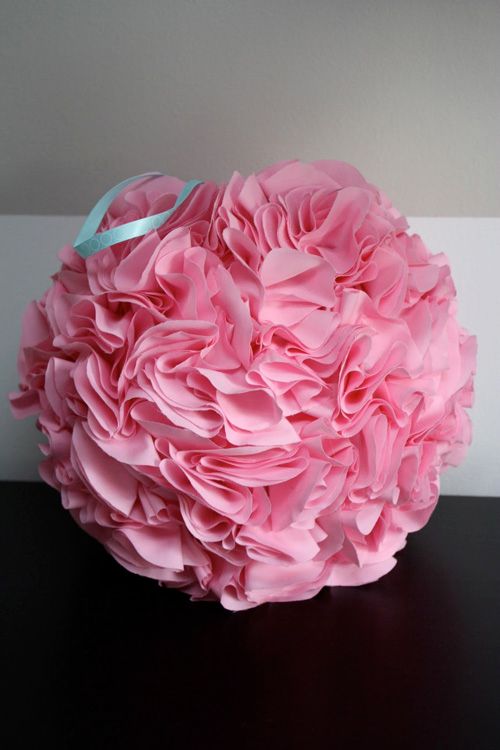
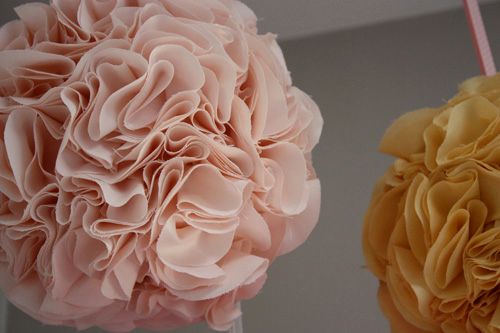
Once finished, it will look like this:
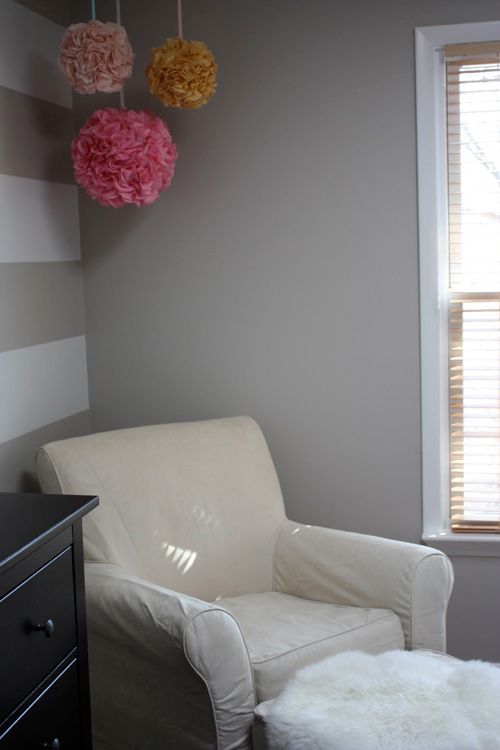
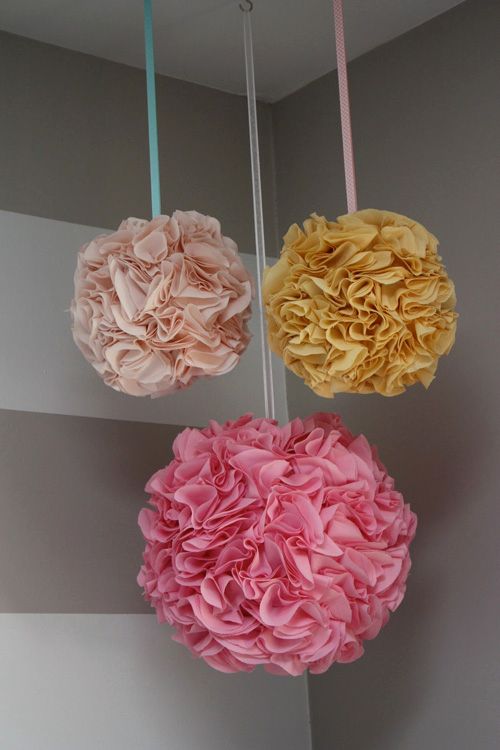
All you have left to do is attach a long piece of ribbon to the hook inside the top of the paper lantern and hang where you want. We picked up an inexpensive pack of mini hooks from Target that simply screwed into the ceiling. It took the two of us to tackle this step so that I could eye the spacing of the pom poms and Jordan could screw them into the ceiling.

Here is a close up on the ribbons I chose. They were each $1.00 for a mini spool at JoAnn fabrics. It took about 1 full spool per pom-pom (then trimmed for length). I chose teal, white and pink ribbons each with its own unique decorative detail to mix and match with the multi-colored pom poms.
Once hung, just sit back and enjoy your pretty, whimsical decor!


Hi! I am wanting to do this project for above my little girl's bed. However, I am wanting to wire this with a light bulb. My question is..do you think there would be enough light emitted with all the fabric over the lantern? I am hoping the amount of light would be equivalent to a night light or greater since this isn't her main light source. Thanks for your time! They are beautiful!
ReplyDeleteTry a fabric that is more translucent, or you could do coffee filters.
DeleteI haven't seen how it looks with a light since mine are just hung without a bulb for decoration. I do imagine it would depend on the thickness of fabric you choose. I chose a pretty thin cotton (which was easy to work with) and I think that if I put a bulb in, it would still emit a decent amount of light. You could always do multiple pom-poms if you need more light. Or one larger one where the hole at the bottom is bigger and lets more light through. Good luck!!
ReplyDeleteCould you use nylon net? That might allow more light to shine through.
DeleteI'm adding this to my "to do" list. We just repainted my 2 year olds room, and these look pretty easy. Where did you find the paper lanterns?
ReplyDeleteThey were super easy, just a little time consuming. I had trouble finding the size I wanted. I bought the large (9") lantern at Party City and actually ordered the smaller (6") ones from Amazon for pretty cheap.
ReplyDeletehttp://www.amazon.com/White-Inch-Small-Paper-Lantern/dp/B004QD2XC0/ref=sr_1_31?ie=UTF8&qid=1318004092&sr=8-31
But I've found larger, 8" ones for less than $1.00 a piece, too.
Great, thank you so much.
ReplyDeleteAbsolutely Brilliant!
ReplyDeleteLove this!!! Did you cut 4" and 3" circles out of the same fabric or just 4" for the large lantern and 3" for the small lantern? Love that you did a how-to!!! Thank you!!!
ReplyDeleteI used the 4" circles just for the large (9") pom pom and the 3" circles for the small (6") pom pom.
ReplyDeleteHow wide was the finished 6in lantern pom-pom? I want to do this for my wedding pew decorations but I don't know what size to use.
ReplyDeleteProbably close to 8-9 inches when finished. I'd say the fabric added at least and inch if not an inch and a half on each side.
ReplyDeleteI just wanted to say thanks for this tutorial! I found it on Pinterest and I have finished 1 1/2 so far, and I LOVE IT.. Thanks soooooo much!!!!
ReplyDeleteI love this idea! Definately need to try this... thanks for sharing! I found you via pinterest :)
ReplyDeleteCass
These are so adorable!! I hang snowflakes from a corner in my living room during the winter months and I'm always looking for some spring ideas to change up when the weather breaks...these would be perfect! Thank you for posting.
ReplyDeleteSince you don't want them to be lighted could you just use those styrofoam balls from Joann's?
ReplyDeleteYou definitely could. You could also try straight pins in place of hot glue in that case.
ReplyDeleteWe used these using styrofoam balls and netting and attach them to the ball with hairpins! At the bottom, attach pretty silk flowers and also some around in different spots on the ball. Then hang with a ribbon. They were called "Kissing Balls" For Christmas, use red and attach some mistletoe!
Deletethis is probably a dumb question, but for the "final" glue step do i put the glue on the pointy tip of the folded fabric or along the folded edge of the folded fabric? thanks!
ReplyDeleteI put glue on the flat side of the pointy tip.. if that makes sense? Pretty much anywhere towards the pointy end will work. It won't come unfolded because you glue it when you fold the circle into quarters.
ReplyDeleteThat was tricky to explain! :)
I love these. Absolutely gorgeous! I made some for my Em, but with tissue paper.
ReplyDeleteI made need to replace with fabric (:
thanks for the explanation...it totally makes sense. can't wait to get started!!!
ReplyDeleteHey i was wondering where did you buy your fabric? I love the colors and i wish i could get the same fabric as you so i was wondering what are the names of the color and fabric? Thanks! They look great byt the way.
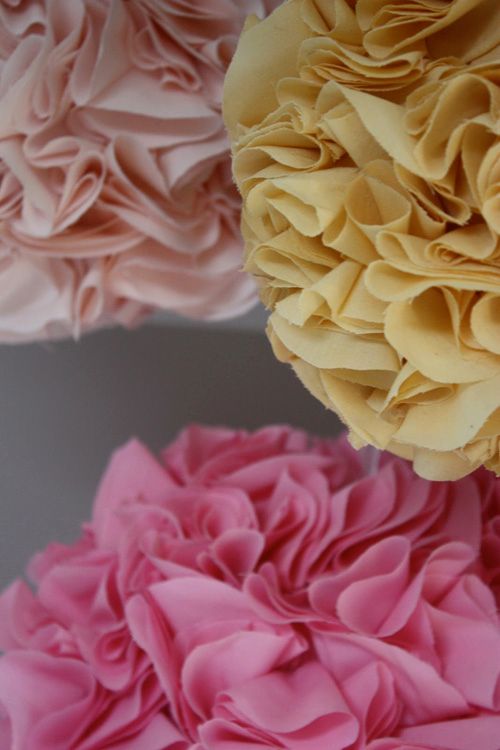
ReplyDeleteI bought it from JoAnn Fabrics, but can't remember what the colors are called. I bought really inexpensive ($3-6/yd) fabric that would be easy to fold. I really wanted a mustard yellow but that was the closest I could find. Other than that, just a bright and pale pink.
ReplyDeleteThank You :)
ReplyDeleteI love love love these! what an awesome job! We're attempting them for my moms bedroon makeover as a christmas gift to her. I haven't yet bought my lanterns, but am wondering did you use 2 yards per lantern (6" ones)? or 2 yards of fabric for both small lanterns? I'm cutting my circles now and will attach when I pick up my lanterns next week, and am looking for a referance so I know when to stop cutting :)
ReplyDeleteI used 3 yards of fabrics with 4" circles for the 9" paper lantern; then I used 2 yards of fabric with 3" circles for the 6" paper lantern. Hope this helps :)
ReplyDeleteHello, what kind of fabric is this? Cotton? Thank you.
ReplyDeleteI was wandering if you could use two different colors? Would it work?
ReplyDeleteI used a really inexpensive cotton fabric. YOu want something that is thin enough to fold easily. All three of my fabrics were $6 or less/yard.
ReplyDeleteYou could definitely do more than one color on a pom pom. You would probably just want to be careful with how you space them out so that you don't have one section all one color, but I think it would look great.
i have another question...i'm making 7 of these and am doing some in plain pink, plain cream, and plain brown. the others i have a patterned fabric for. i'm not sure how much (if any) of the pattern will show, but wanted to get your advice on if i should fold my patterned circles with the pattern on the outside or inside (hopefully that makes sense). also, i was wondering how you think burlap would work for a project like this...i see from your comment above that a thinner fabric is better, so maybe no on the burlap!
ReplyDeleteI would fold with your pattern on the outside. Your first step is folding the circle completely in half, dab of glue, then in half again. So the inside shouldn't show as much as the outside.
ReplyDeleteI love the idea of using burlap. My only concern would be fray issues, depending how 'rough; your burlap is. I honestly did a test lantern so I could figure out circle sizes, glue patterns, etc. I had an extra lantern to do so. You could always buy a scrap piece of burlap and try cutting and folding to see how easy it is and how the fabric reacts. I'd love to see if you try burlap though!
Love the idea, I think I'm going to try and make some for a baby shower. I don't know if I have enough time, how long did it take you to make one? Thanks!
ReplyDeletethanks! love the idea about making a "test" one. and i do have an extra or two. one more question...what does the bottom look like? my lanterns have an opening in the top and bottom, which i think is pretty standard, but i was wondering if you just left it open or if you were able to fill it with the folded circles somehow...
ReplyDeleteso glad you haven't responded yet since of course i have another question. how close did you glue the circles next to one another? right up against each other or just fairly close since the "fluffy" part will probably cover up any visible part of the lantern. thanks and so excited to get gluing (making 7 for the nursery...circles are cut, but baby is due any day!)
ReplyDeleteThe project took me a full weekend (several hours/day) to complete. I just picked a weekend where the hubby was away and I could watch trashy tv and sit in front of the couch.
ReplyDeleteYou definitely want to fill all the white space on the lanterns and not leave any, even if some of the 'fluff' of the circles covers it up. Because you want your lantern to be very fluffy and really full (as you can see in the closeup shots). Otherwise it will look a little sparse. It takes more time and fabric, but I guarantee you will be happier with the result.
Also, the bottom is open, but you really can't see it unless you are under it looking up. If you place the circles surrounding it just right, they will do a good job covering a up a decent amoutn of the circle. But what shows really won't be noticeable.
I love your color choices.
ReplyDeleteThank you! :)
ReplyDeleteThese are fabulous! I am going to try these for my daughter's room and a baby shower. The shower will be in the same colors as the nursery, so the mommy-to-be can use them in there as well. Thanks so much for sharing! I found you via pinterest:)
ReplyDeleteHi, I seen where someone did this using coffee filters. I was thinking you could cut them down or maybe dye them any color or even coffee or tea dye them. Or buy a box of rit dye or food coloring. I'm not sure I have never even atempted this. But they said the filters was cheep. But I think material seams easier.
ReplyDeleteI was also thinking it might work with coffee filters. Also, we use a liquid watercolor paint at my preschool that dyes coffee filters beautifully, so I think that food coloring would work just as well.
DeleteI also had a question about the fabric circles -- did the fabric fray along the cut edges?
Neat I have around 5 lanterns and had no idea what to do with them, now i do thx
ReplyDeleteI just tried this with an 8" styrofoam ball and push pins but it didn't come out as fluffy as yours and I would need more fabric even though I got 3 yards and used 4" circles. I think it didn't come out as good b/c of the pins. I think I'm going to start over and do the glue gun/paper lantern method but I will probably have to iron the circles first.
ReplyDeleteGood luck! I think the glue over pins is key. Since you glue each circle twice, it keeps the folds together and keeps it fluffy and won't fall apart.
ReplyDeleteThis worked out so much better! It almost looks like yours :) I love, love, love it and it didn't take too much time, although maybe I was just so excited at how awesome it looks.
DeleteI'm so glad!! :)
Deletesaw this on pinterest and love it! thanks for sharing!
ReplyDeleteFound you on pinterest and love it..making them for my daughters room...I had some old sheets that were wearing thin...ready to be recycled...so I dyed them the colors I wanted and am using it for the fabric. After being 'used' the material is nice and thin and is working great...also gave me the option to dye to the color/dye pattern that I couldn't necessarily find in fabric. Thank you for the great idea and directions!!
ReplyDeleteI love that you dyed the fabric! I bet they look great.
DeleteI just finished making these for my living room. They are super cute, can't wait to hang them up. Thanks for the awesome tutorial!!!
ReplyDeletedid u use the same size lanterns as Jessica? I could only find 10, 12 and 16 inch. I"m still cutting circles out.
Deletethanks Sandy
Hi! I love this idea. I just bought some paper lanterns from Hobby lobby and just realized that the sizes are 10,12 and 16" lanterns. So i will have to figure out how much more material I need. But my my question is did you use the 4" circles for the 9" lantern? and the 3" for the smaller lantern. Will it matter? Thanks!
ReplyDeleteYes! I used the 4" circles for the 9" lantern and 3" circles for the 6" lantern. I did the 9 inch lantern first and when I tried to use the same size for the 6" lantern the ruffles looked a little 'floppy', so I used the smaller, 3" ones to make a tighter design.
DeleteI know this is a silly question-- but what color is on the wall?? It is perfect. I want to do in my little girls room. Thanks!!
ReplyDeleteThe wall is Martha Stewart "Sharkey Grey." and the stripes are Martha Stewart "Lamb."
DeleteI did our little girl's room in a color similar to that, and a bright pink for the accent wall. I can't say how much I love it!
DeleteWell, I finally go the material and lanterns to do this. Wish me luck :). I hope mine turn out just as cute as yours!
ReplyDeleteGood luck!! Sorry for the late response :/ Send pictures once you're done! I'd love to see. :)
DeleteWhere did you find your lanterns? I found some paper lanterns but the creases go the other direction so it doesn't turn out the same.
ReplyDeleteI found the large 9" one at a party store. The smaller, 6" lantern I purchased off Amazon. For super cheap - maybe $2 and change.
DeleteDid you use 3 full yards per lantern, or was that your total?
ReplyDeleteI used three full yards for the 9" lantern and 2 full yards for the 6" lantern.
DeleteOk. I have my fabric and lanterns, but I'm confused on the printed out 3" and 4" cirles. Before you traced them to cardboard. Where did you find the circles to print them out?? I wanted to start them this weekend. Thanks!!
ReplyDeleteYou can easily create a circle in a program like Publisher or Word and make it the exact size you want. Otherwise, the easy way to go is to just use a glass or can about the size you're looking for. :)
DeleteThis comment has been removed by the author.
ReplyDeleteHow would you dust/clean this?
ReplyDeleteHow would you clean these? would dust pet dander etc not build up?
ReplyDeleteWould you judge me if I said I never cleaned them since they were installed a year ago? I honestly haven't noticed any dust or pet dander built up on them. We keep the animals out of the nursery for the most part anyway. But dust wise, I really don't see any.
DeleteMaybe you could use the spray air that you use for computer keyboards?? Just don't get the nossle too close!
Delete--Liz from Michigan
Hello,
ReplyDeletethats Great.
I like it very very match
greatings from the Nederlands send you Conny
Thank you!!
DeleteThat's beautiful! Thanks for sharing.
ReplyDeleteI just got like 6 lanterns from Target's $1.00 section :) Now I have something to do with them.
Nice! I may need to take a trip to Target. I'm itching to make some more lanterns.
DeleteI love these and I plan to start making them soon as well. Off topic, but I also want to paint my nursery grey and I love the color in your photo... could you tell me what paint color and brand it is? It's exactly what I want! :)
ReplyDeleteMartha Stewart 'Sharkey Grey.' I think Home Depot discontinued the MS paint line, but they still carry the swatches. One of the other aint companies (I think Glidden) is able to reproduce any Martha Stewart paint color. I love this grey. I wish I painted every wall in my house that color. Maybe some day!
DeleteIf I bought 1 fabric in 3 yards and two others in 2 yards, will I have enough circles to make 2 8" and 1 10" balls?
ReplyDeleteI had to use 3 yards for one 9" lantern and 2 yards for one 6" lantern. I pretty much used the full 3 yards of the 9" and had some left over for the 6". You might ok for the 8" lantern with 2 yards, but you might have to space the fabric out a little more than I did. I personally think that the more fabric and the tighter you space them, the better it looks. Just my opinion, though.
DeleteCan you tell me the measurements on the spacing of the hooks? I like how yours are placed and if you could tell me how far apart they are that would help a bunch :) thanks and I love these poms!
ReplyDeleteI don't mean to be ignoring your question. I just haven't had a chance to measure. I've been out late and every time I get home it's time to put Lucy to sleep so I can't measure. I'll do it this weekend and get back to you.
DeleteOk I finally measure them. There was no real rhyme or reason to the spacing, I just eyeballed it and told Jordan where to hang the hooks. The white and blue ribbons are approximately 6 inches apart, white and pink are about 8.5 inches, pink and blue are about 10. With regard to length, the blue is about 12 inches long, the pink 15 inches long, and the white 22 inches long. Hope this helps!
DeleteThese are fantastic! Absolutely gorgeous....I was wondering if I wanted to make bigger pom poms., say 10 or 12?...would you recommend using bigger cutout circles? Thanks in advance for your reply....can't wait to make these! :)
ReplyDeleteI would make them a little bigger. Not much! Or they will be too 'floppy'. THe smaller size might work just well, too.
DeleteJessica, quick question: What's the paint color in that room? I'm sorry if you've answered this in a previous post; I'll admit to not having read all of the comments. :)
ReplyDeleteNo problem :) Martha Stewart's 'Sharkey Grey.' From Home Depot.
Deletethank you for posting this, I made these for my friends baby's room. they came out amazing, absolutely beautiful !! everyone loved them. with that said, it was time consuming & tedious cutting out the material. but in the end worth it. I wish I could post a pic to show you how pretty they came out. thanks again :))
ReplyDeleteIf you want to send me an email with a picture of them I'd love to share on the blog.
Deleteawesome post!! I am making these for my wedding in August. :) Can not wait to see what they look like when I am done!!
ReplyDeleteI'd love to see! Send a pic and I'll post it on the blog. :)
DeleteNot sure if anyone's mentioned this yet, but Ikea has super cute paper lantern ceiling AND floor lamps. I have them in my office and I'm totally going to up-cycle them with this idea and a sheer fabric. It's probably gonna take a while, but such a cute idea is worth it. ;) Thanks!
ReplyDelete(Here's a link to the floor lamp: http://www.ikea.com/us/en/catalog/products/80213597/ )
Great idea. I never thought about a floor lamp. I'd love to see pictures when finished. :)
DeleteI am totally going to try and master these for my baby girl's nursery!! I wonder if anyone has thought of investing in the OFLA fabric circle cutter I saw online at Michaels...or purchase pre-cut fabric circles online (I wonder how many you would need)...thanks!!
ReplyDeletePre-cut fabric circles would work great, unless you are picky and want a particular fabric pattern. A circle cutter would have saved me tons of time. Good investment!
DeleteI love what you've done, they're so cute! Where did you find your lanterns though??
ReplyDeleteParty store and Amazon.com, depending what size you want.
DeleteWhat an awesome idea!
ReplyDeleteSuper cute, going to try this with my daughter this weekend:)
ReplyDeleteGood luck!
DeleteOkay... I love love love these! I'm doing so many diy projects for my soon-to-be-born baby girls nursery that I'm kind of scared to take on another time consuming project. (Especially since I typically go to bed when my 3 year old does at 8pm) So... my question is... do you know how many circles you needed? Because if I can buy pre-cut circles it would help a lot! Thanks!
ReplyDeleteI couldn't remember off the top of my head, but it looks like I used around 300 on the 9" circle. (Eek!). 3 yds of fabric, 100 circles each yard. I forgot to count for the 6" circle. :(
DeleteWow what a hit! I was just considering if to buy paper pompoms for my little girls room but thought there must be an easy diy-way. Thanks for the instructions! I must try it after christmastime.
ReplyDeleteGreetings from freezing Finland!
Good luck!! I'd love to see the end result.
DeleteI am doing these for my baby girls nursery. I bought a circle cutter at Hancock's for $20 that cuts 3 and 4 inch circles. Might be the best investment ever. I cut out 1 piece of fabric circles in about 30 mins. I wasted more fabric than I wanted to, but it was less than $3/yard so I can get more if I need it. I found 8 in, 10 in, 12 in lanterns @ Hobby Lobby for $4.99. A little bigger than the sizes above. I just guessed on how much fabric I would need. The circle cutter is a must have item though!!!
ReplyDeleteI definitely need to get a cutter for the next time I do this project. Thanks for the heads up.
DeleteGORGEOUS!!!!! We just did the MS ones and will be doing these on our next attempt. BTW, we are painting my daughters room grey and we LOVE the color you used on the room featured in your photos. Do you recall who the paint is made by and the name of the color you used? Great work and thank you for sharing!!!!
ReplyDeleteMartha Stewart's 'Sharkey Gray'. My favorite paint color!
Deletedo you remember the exact names of the fabric colors?? i love the combo together, thanks!
ReplyDeleteUnfortunately I don't... I'm sorry.
DeleteI have always been rather hesitant of trying this with paper lanterns as opposed to styrofoam balls, but with your beautifully detailed tutorial I am going to try this way. Styrofoam balls can be quite pricey for the size I wish to have. Thank you for all you do. I will surely be staying tuned.
ReplyDeleteJessica please help me. I am feeling like I'm doing this wrong. I am super confused about how to glue it down. In the photo it looks like there is no glue after the circle is folded in half so the point is not pointy and glued down flat at the tip. But I've been doing it by folding in half, gluing center of that fold, then folding again, which gives me a very pointy point that i cant glue down flat at the tip like in the 3rd pic from once wed. Their First pic looks like they do glue the half point then on the side of the final tip, but their third pic looks way different. Also i don't know why but mine look way squished and too full when i try and cover every inch of white. I used about 40 pieces for like 3 inches! I know that isn't right. not sure how else to cover all the white. I am doing an 8" with just under 4" circles. Please help me! Thank you tons!!!
ReplyDeleteArmina, After you fold the circle in half once, I put a dab of glue closer to the middle before folding in half once again. That way the bottom 'point' of the ruffle isn't stiff. Then I sort of mushed the point so it's flat and put a dab of glue on it so the ruffle stands up straight, if that makes sense. I used a TON of circles. If you read above I used three yards of fabric with almost 100 circles per yard. The more you use the fluffier it gets and the ruffles help each other stand up.
DeleteIf you need, shoot me an email (simplekindoflifeblog@gmail.com) and I can send you a video of the circle process if you need. I hope this helps somewhat.
Jessica, you are SO amazing! THANK YOU SO SO MUCH!!! I would love a video if you already have one!! To get a better understanding of placement. Otherwise I would hate to trouble you! I will send you an email so if you do, you can send it to me. :) Thank you SO much again! I am making these for my baby girl's room who is due in a month and a half, but my sisters want to use it for my shower which is in a week so now I'm on a time crunch for them. :)) Thank you millions!!
DeleteSorry I didn't to leave you a way to contact me!
ReplyDeletexoxo Thanks so much!!
Armina
This comment has been removed by the author.
DeleteSomebody is using your photos for their etsy.. Not sure if you care just wanted to let you know. if you search fabric pom poms you will see it.
ReplyDeleteYou gals need a "Big Shot" die cutting machine and the circle dies to cut the circles out. Much much faster. You can cut several layers at a time! I am a Stampin' Up demonstrator and we sell them.
ReplyDeleteSo I have a question that I know you have answered in other comments, but I just want to clarify the total amount of yards of material used is 5 or 7 yards?? I didn't know if you used a total of 2 yards for the smaller lanterns or 2 yards for each:-). Sorry to be a pest, I am going to attempt these for my soon to be born baby girls room. I am on bed rest and figure it is something I can do while sitting around:-). I think I might try 5 or 7 lanterns, though, I am putting them over her crib which will be catty corner in the room and I feel like maybe 3 won't be enough, what is your opinion? Also, her room is gray with one wall gray and white chevron strips. I love the gray as well:-). Thanks in advance for your response.
ReplyDeleteThis comment has been removed by the author.
ReplyDeleteThis sounds like you could use paper baking cups that you would use for cupcakes..depending on the size of your lantern/styrofoam ball. Do you think this would work? They are about the size you mentioned and you can get them really cheap.
ReplyDeletevery cute!! would be great for decorating a wedding reception/ceremony if you're on a budget or trying to DIY most of it.
ReplyDeletewww.myweddingbagonline.com
You idea about paper lanterns is awesome !! you are really a Genius.
ReplyDeleteWould a Huge roll of Plastic Tablecloth work for this or will hot glue warp/melt it too much?
ReplyDeleteI've been looking for this tutorial, good thing I saw your blog. I'll renovate my baby's nursery and this would be good decoration using some dressmaking fabric we have. Thanks for sharing.
ReplyDelete