
Sometimes you don't know how easy something will be until you dive in and give it a try. I learned that this weekend when I decided to take the plunge and paint stripes on one of the walls in the nursery. It was easier than I had anticipated and figured I would give you all a tutorial of how to do this project so you can try it, too.
First, you choose the wall where you want to paint the stripes. Initially I was going to paint the wall behind the crib. After careful thought, I decided that the stripes would look better and stand out more against the dark dresser rather than blending with the white crib.

The next step is to decide how many stripes and how wide you want them on your wall. I measured the wall from ceiling to trim. That's where I hit a bit of a snag. The wall is 92" on the left side and 93" on the right side. After careful thought I decided that I wanted each stripe to be 10" wide. That would give me 9 stripes, with one of them being 2-3" wider than the rest. I was alright with this because with 9 stripes I could make sure that the top and bottom stripe were the same color as the rest of the walls. That helps to make things flow within the room. The larger stripe would be the bottom one and because of the furniture, this minor difference wouldn't be noticeable. Once that was decided I whipped out my ruler/level and pencil and began marking the wall.
Starting at the ceiling I measured 10 inches down and made a mark. I continued this a few times down the length of the wall. Once I had my first line marked, I used my level to connect the dots. I relied more on the level than I did the marks to ensure I would have a straight, even line. The marks were used simply as a guide since the wall is uneven from left to right. I continued this pattern until I had 9 stripes lined out in pencil on the wall.
I used the previous line as a guide with my level to mark even 10 inches down.

I have read that many people use an L-ruler to draw their lines, but since walls vary and you could have an issue like I did where the wall is uneven, the level worked out much easier and faster for me.
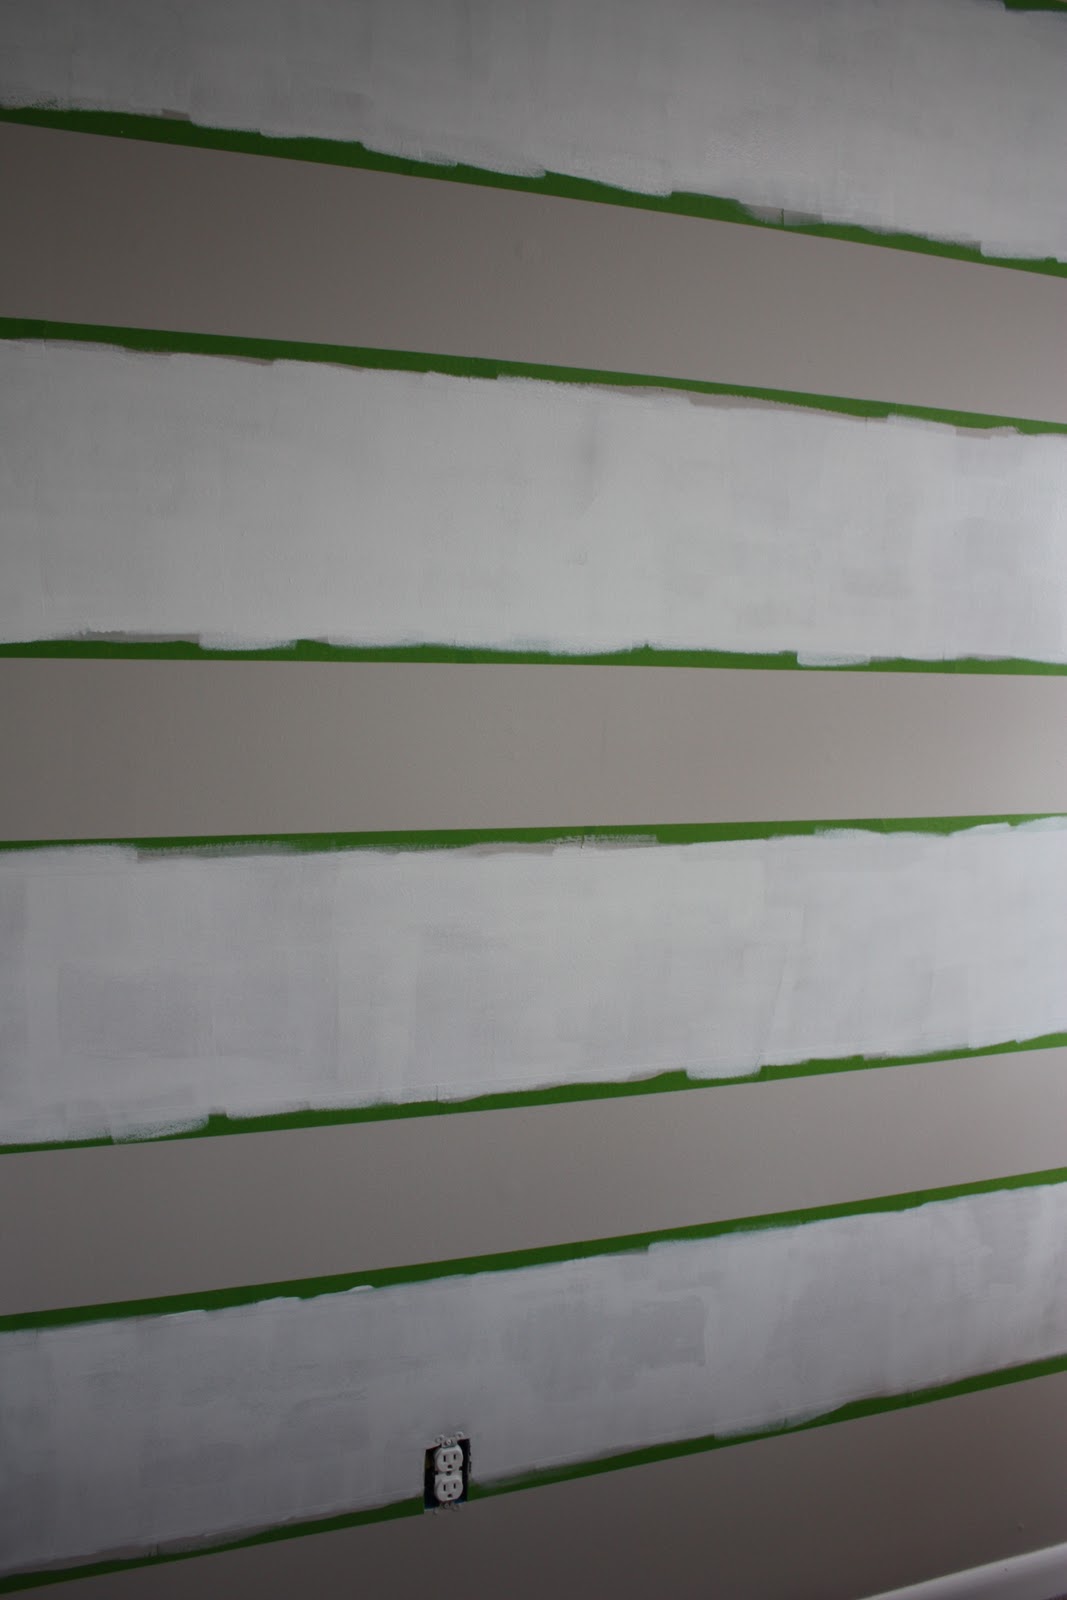
Once your marks are set, you can begin to tape out your stripes. One thing you want to make sure is that you line the tape up along the lines on the outside of the stripe you are painting. The painter's tape will then be on the inside of the stripe you are leaving alone. Your wall will look something like this:

Stripes 2, 4, 6, and 8 are the ones being painted.
Don't forget to put a strip of tape at the corners of the wall. Not only does this keep the paint only on the wall you want, but it guides you eye and helps make sure you are painting the correct stripe. All the lines can make you a bit dizzy and you don't want to accidentally paint the wrong stripe. I also wrote a small 'W' on the pieces that I was painting as a guide. You can see a faint letter in the below picture.

Now here is where I need to take a moment to praise FrogTape. (And no I am not being paid to do this.) I have always been a loyal blue painter's tape user. It was what my dad always used when he would paint around the house when I was younger, so I never thought twice. That being said, I have always had issues using with bleeding through and the tape tearing paint off the ceiling when the blue tape was removed.
When researching how to paint stripes, every blog and website I found insisted that you must use the green FrogTape for your lines. They all swore that using this tape would result in no bleeding paint. I figured I might as well give it a try. Boy am I glad I did. This tape was so easy to use. Not only did it apply easily, but my lines came out perfect. I have now become a loyal user of FrogTape and I vow to never turn back to the blue stuff.

Ok back to the project.
One trick I've read that I found to be incredibly useful is to take some of the leftover paint from the wall color and do a thin coat of that color along the edges of the painter's tape inside each stripe. That way if you are prone to paint bleeding through your tape (like I always am), the bleed will blend in with the wall color. You just need to wait a few hours after doing this step before painting the stripes their color to ensure that the edges have dried.

Once that has dried, it's time to paint your stripes! I purchased a mini roller and paint tray to match my mini paint can. But also so that I can just rely on a roller for the stripes rather than a brush to ensure even paint distribution. Depending on the width of your stripes you may not be able to use an average sized paint roller.

The color I chose was Martha Stewart's 'Lamb." It's a white color with a hint of a grey tone. I picked that color so that it would go nicely with the grey in the neutral 'Sharkey Gray' the rest of the walls were painted.

One of the great things about Martha Stewart paint swatches is that tiny symbol in the corner. The paint swatches with the same symbols coordinate best together. So when I was looking for a hue of white to go with Sharkey Grey, I found one that had the same symbol as the color we already painted the room.
 picture snagged from Home Depot
Because of the color we initially painted the wall, it took me 4 coats to cover it and evenly fill the stripes. I simply painted top stripe to bottom stripe and then over again four times. I didn't wait an hour or so between coats, but it worked out just fine for me.
These pictures are only after the first or second coat, I forget which.

Now another important trick is to remove the painter's tape right after you finish the final coat, before the paint dries. If you wait until the paint is completely dry you may end up peeling up some paint, resulting in jagged, uneven lines.
Once you remove the tape, your walls will look like this:


That doesn't seem so hard, now does it? Honestly all this project takes is some patience and dedication. The hardest and most crucial part is in the beginning when you are measuring and marking the stripes. Once you get the tape set and whip out the roller it's smooth sailing from there on.
I'm so glad I gave it a try and couldn't be happier with the results. Now I can't wait to take on more challenging DIY projects that I've always wanted to try but never had the guts to do.
Updated photos:


I've read lots of tutorials on painting stripes and yours is very good- I really appreciate your tips! Thanks a bunch :) We have that same dresser- in the room where we plan to do stripes :) You have a cute blog!
ReplyDeleteYou're welcome! I had never painted striped before so this project was a combination of research and making some of it up myself. I was surprised how easy it was. It was a bit time consuming, but if you want things to be accurate and as perfect as can be, it's totally worth the time.
ReplyDeleteGood luck and thank you!!
I love this!! AND, i'm going to do your subway sign DIY because i have always been obsessed with those!!
ReplyDeleteYour wall looks great! I'm using your tutorial to tape out some stripes on a hallway wall tomorrow. Found you on Pinterest.
ReplyDeleteWhat type of finish did you use for the walls? I always struggle with how matte or shiny to go...
ReplyDeleteI used regular eggshell like I do on all my walls. Nothing fancy. I didn't want it to be glossy or super flat.
ReplyDeleteThank you so much for creating this post! I am painting my new baby boy's room in a darker gray color, but I wanted to do stripes as well because there is A LOT of wall space in his future room. I needed something to break up the solid color!
ReplyDeleteWhat is the other color you have on your wall? I really love it! Thanks!
ReplyDeleteThe gray is Martha Stewart's 'Sharkey Gray" and the white is "Lamb," also by Martha Stewart.
DeleteThank you so much for posting! I just finished my entry wall with gray and white and it looks amazing! The FrogTape is AWESOME and thanks for the wall color paint tip. I had 100% NO bleeding! I've never received such great results painting. Your blog was so helpful and I really appreciate it... THANK YOU!!
ReplyDeleteI'm glad you had success!! I tried to be pretty specific with my details so they were easy to follow. The Frog Tape is great, right? I love it now. No more blue!! And I can't take credit for the tip, but it really helps.
Deletedo you remember where the dresser came from??
ReplyDeleteIkea!
DeleteThanks for this. I'm painting two walls next week and this will help a ton!
ReplyDeleteHow long did you wait to paint your stripes after you painted your wall color?
ReplyDeleteI definitely waited a few days... Maybe a week? Since I knew I would be using a lot of painters tape I wanted to make sure the paint was set before starting the stripes.
DeleteYour blog has given me that thing which I never expect to get from all over the websites. Nice post!
ReplyDeleteregards,
airless spray
Dumb question, did you draw a horizontal line all the way across your wall with the level and then tape? My greatest fear with stripes is to have that first line be off an then every stripe hinges down slightly for the entire wall. Your wall looks great! Job well done!
ReplyDelete