31 October 2012

Pinned It, Did It: DIY Custom Mason Jar Tops

Another toddler related DIY project to share with you all. I guess that's what happens when a hurricane keeps you locked up in the house with a 15 month old for two straight days. Technically I didn't actually pin this one. This is a DIY project that I've seen a few times around Pinterest, but a friend of mine recently pinned it and brought it back onto my radar. I had seen a few of these mason jars used as toy storage with animals glued to the tops and spray painted. Such a creative and cute storage idea. I love using mason jars and already use them around the house to store Lucy's crayons, my makeup brushes or paint brushes, etc. You all may know my affinity for spray painting things gold (here and here just to name a few), and apparently my sudden interest in painting small plastic animals. This little project seemed right up my alley.

all images via Pinterest

I wasn't even planning on tackling this project anytime soon, but this past weekend while waiting for a prescription to refill, I found myself perusing the local Dollar Tree. I came across some mason jars. For $1.00 a piece I was tempted to stock up on several even if I didn't have an immediate plan for them. After walking the aisles a bit trying to find some easy toys to keep Lucy distracted during the storm, I found a few plastic Disney Princesses. Jackpot. My DIY was decided at that moment. You all know I already have a hefty supply of gold spray paint.

The steps for this DIY are pretty easy and self explanatory. 
1. Glue the toys to the top of the mason jars (I used super glue and a lot of it). 
2. Next spray paint your lids whichever color you desire.
3.  Fill the jars with toys or goodies and display.


What a great and easy addition to Lucy's 'big girl room'. I liked the idea of using the princesses over the dinosaurs and animals to give them more of a 'young girl' touch.


What are you pinning and doing?

30 October 2012

Homemade Fingerpaint = Best DIY Art I Own


I'm not even sure why, but long before I was even had Lucy, one thing I've always wanted as a mom was to have frames all over my walls proudly displaying my child's artwork. That has been a dream of mine for a while.  The idea of it just seems so sentimental and sweet and I love the idea of such one of a kind, personal art. Plus I not so secretly hope my children enjoy doing arts and crafts as much as I do. 

I also want Lucy to look back and remember me as a fun mom. I hope that when she grows up she can say her childhood was never boring. Of course I'm dying for her to have a creative artsy side, but I would never force it on her. Lucy is now at the age when I can really start to introduce little activities to her and take her to Children's Museums and other interactive places and I want to take full advantage of that. 

I can honestly say I had a fun mom. My mom is very creative and has an artsy side. After all, her father was an artist. I remember she used to buy these huge rolls of paper and every year or so she would trace the outline of each of us on the paper. We would finish the  drawing of ourselves by drawing and filling in the clothes, hair, etc. It was fun to pull out the old ones and see how we had grown. One year for Dr. Seuss' birthday, my mom made us green eggs and ham. I'm pretty sure we all looked at her like she was crazy and no one ate any, but still the idea was fun and genuine. My mom also used to make us homemade 'happy meals' with her own chicken nuggets, fries, and brown paper bags. Some days she would give us a newspaper article and assign everyone a letter. Our task was to find that letter and circle it every time it appeared throughout the article. Looking back now I'm sure that last one was just my mom trying to give herself 15 minutes to get dinner started. Nonetheless I still remember it and we found fun in the activity. 

I came across the idea of making homemade edible finger paint on Meggan's website, The Birth of a Mother. It looked like such a fun idea and a great way to spend an afternoon with Lucy. The recipe I used was from this website I found by searching on Pinterest. Love Pinterest. How many times have I praised that website?


I followed the recipe on the website, but needed to adapt it a bit when I found my mixture to be super watery and too runny to stick to paper. I tossed almost another full cup of flour into the mixture until it was the texture I wanted. Looking back I would cut the entire recipe in half because I had a lot of leftover paint in the end.


The food coloring I purchased was just a generic Target brand box I grabbed while stocking up for the hurricane. What I didn't realize until I got home was that the box had little recipes on the back to make your own custom colors. I knew from the beginning that I didn't really want the traditional red, blue, yellow, green color scheme and planned to attempt creating my own colors anyway. I thought this was a great idea. 


I opted for coral, lime green, purple and aztec blue.


One of the smartest things I did for this project was covering Lucy's highchair tray with parchment paper. As she painted, pools of paint built up all over the tray and it was so easy to just grab all the paper at once and toss it when she was finished. I didn't have to clean an inch of the trays. Now the seat straps were another story. I'm still scraping dried up paint out of them. Next time I'll wrap them in parchment paper, too.


I made the paint while Lucy was napping and decided to transfer smaller portions into mini cups for her to use. Knowing Lucy and her tendency to try to 'dump' things on her highchair, I wanted to lose a little paint as possible if she started the craft with a good spill. I took some plastic cups we already had at home and simply cut them down to size.


Once Lucy woke up and had a little power snack of cheese and strawberries, we were ready to paint! I was actually surprised that she dove right into the paint and got to work.


Lucy had a few different techniques. One was dabbing the paper with the tip of her finger, another was smearing the paint with her entire hand. I pretty much let her play and do what she wanted with the paint, even tasting it a little it as she went along. 


One of her favorite techniques (although it wasn't necessarily a painting technique) was to squeeze the paint in the palms of her hands. I think she enjoyed the texture since it was a little thicker than traditional paint.


In the end Lucy made 8 pieces of art. I just kept swapping out paper as each filled up until she became bored with it (aka was only interested in eating the paint.)  Because of the texture of the paint, I set towels out and put the art on the towels to dry overnight. The pages were a little heavy while they were wet, but once dry were much lighter and easier to work with. 

I love every single one of them. 


And in case you were wondering how Lucy fared..


Honestly even cleaning her up wasn't that bad. The good thing about the ingredients of the paint is that when it started to dry, it formed sort of a paste and wasn't drippy. I didn't have to worry about smearing the paint on myself and simply carried her right up to the bathroom and stuck her in the tub.

I already purchased frames for three of my favorite pieces. Still debating where to hang them, but thinking in the dining room.


I think I would say this first project was a success. I knew it could go either way when I planned it. If it was a failure we would move on and wait until she was a little older and try again. Since it was a success, well... everyone might be getting finger paint art for Christmas this year.

28 October 2012

I Don't Dread Mondays When Work is CLOSED

Hurricane Sandy is creeping in and I've got our house fully stocked with food, water, and plenty of DIY projects to work on, hoping we don't lose power. I will have lots of fun things to share coming up this week and next. 

I'm also excited to share with you all my first custom order painting. I finished and shipped out this past week. Having this done just gets me even more excited to get my own little shop up and running. Just hope others like my paintings as much as I do. 

Here are a few shots of the finished painting. 


And a glimpse at a few other finished pieces.


I'm really hoping to be able to announce the opening my of shop soon, I just want to make sure I have a good variety to show. Of course you all will be the first to know.

For those of you in Sandy's path, stay safe! 
Use it as an excuse to tackle all those projects you've Pinned. :)

25 October 2012

Coffee Talk

I've been pretty happy with the living room set up lately, except for one thing. Every time Lucy runs around the coffee table I have a mini panic attack. I picture her slipping, falling and hurting herself on the corner of the table.  


My parents have had this round coffee table in their attic as long as I can remember. I honestly don't even know where they used to have it. I don't remember seeing it in either of the houses I grew up in. It was just one of those pieces of furniture I would scoot around, lean over, and move past when looking for treasures in my parents' attic over the years.


I knew for my sanity that I needed to swap out the old Ikea coffee table for something a little less 'dangerous', but I'm not ready to shell out a ton of money on a brand new table. I can't even remember exactly how I thought of this table. I'm pretty sure it was one night in Lucy's room rocking her to sleep. As odd as it may sound, I get some of my best ideas when I'm sitting in Lucy's dark bedroom, snuggling my girl to sleep. That or in the shower. I literally would force myself to shower when I needed inspiration for a school project or an idea for a gift for someone or some other odd thing like that. 

Anyway... I texted my mom immediately and she told me the table was mine. 

It's a little beat up. And I like that. I'm not crazy about the fact that there are wheels on it. Furniture that moves is not ideal with a toddler, but she hasn't discovered that it is mobile, so we are good for now. I fear the wheels will scratch our pretty and (effing expensive) wood floor. So I'd like to eventually remove them, but need an alternative solution if I lose too much height knocking the table down an inch and a half or so. 


I really like the color of the table in the room. I'm so over the 'let's have matching dark Ikea furniture in every room' kick I apparently went on when I moved here several years ago.  Seriously, have you seen our bedroom? That's why we needed to swap the beds. It was a dark dungeon. I love mixing and matching different wood finishes and this table definitely breaks up the monotony of the room. You would all see this if I had taken a better photo. just realized I zoomed a bit too much on the above picture and cut out the side tables.


What do you all think? It's a temporary fix, but it's doing the trick. I like the character of the flaws, but keep wondering if I should do something to it. Should I paint it? Leave it? 

22 October 2012

DIY Floral Arrangement


I don't have a green thumb. I will probably never be able to maintain a successful garden. I don't even know the names of most flowers. What I do know is what looks pretty. I also know how to take something done professionally and learn to DIY it for less. 

My grandmother's birthday was last month. Buying gifts for my grandparents is hard. Really hard. What do you get for an 82 year old woman who has everything she needs, needs nothing, and even has everything she doesn't need? A pretty flower arrangement. And why spend a fortune on one when you can do it yourself? 

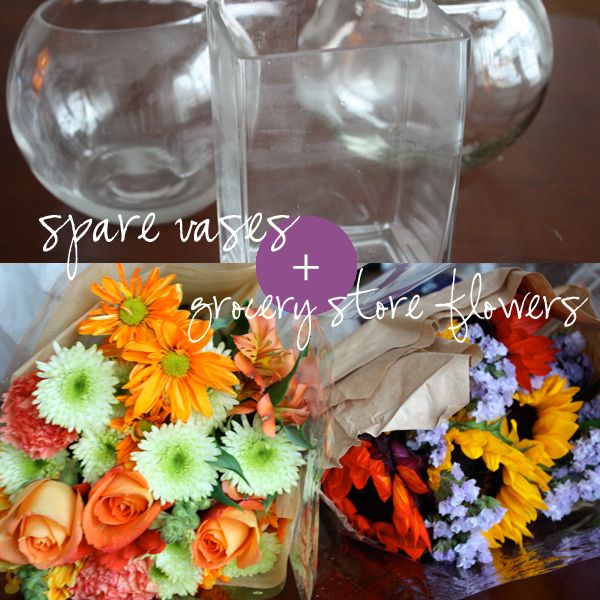
This DIY was super easy and super inexpensive. Anytime I get flowers from Jordan I always keep the vase. I have tons of vases that I've collected over the years. I never had a plan for them but knew I would figure something out down the line. All I needed to buy was some tape and the actual flowers. 

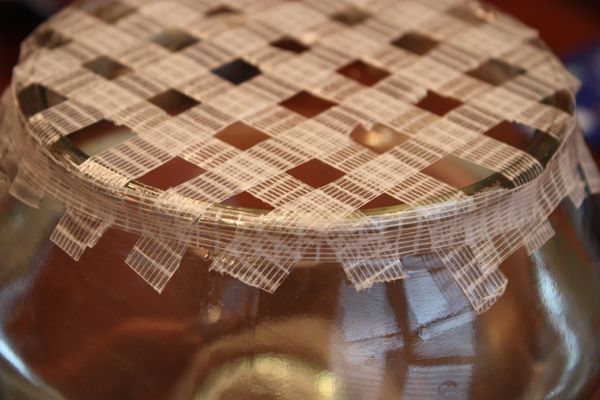
First step is the most important and pretty much what makes or breaks the arrangement. I took clear duct tape and cut it into quarters making skinny strips. I'm sure there's fancy professional florist tape that actually is this size, but I settled for the duct tape purchased for cheap from Walgreen and the tedious task of cutting it into pieces. Ah, well..

Once I had my strips cut I ran them across the top of the vase, criss-crossing them like the top of a pie leaving small square openings between the strips. 


Now you could do this project using just one regular sized mixed bouquet found at the store. I bought two because I wanted to add sunflowers to be a statement flower and of course they were in a separate bouquet than the one I wanted to use. I spent $15 in total on the flowers for two bouquets, but you don't even need to spend this much. I had some leftover flowers that I stuck in a vase for myself. Side note: Whole Foods has some of the best flowers. I highly recommend. 

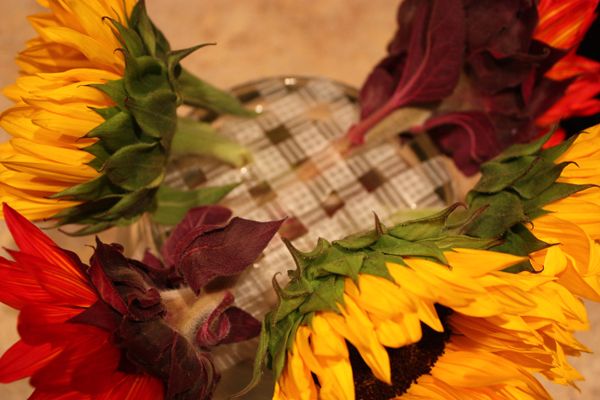
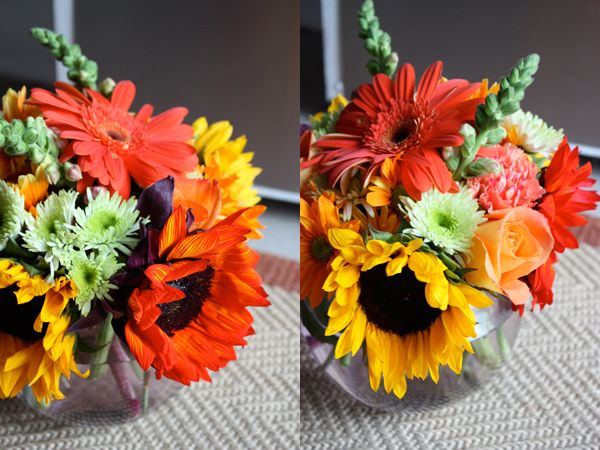
I trimmed all the flowers to the necessary length. To start, I picked the largest, statement flowers and put them into the vase through the holes between the tape, spacing them out as I saw fit. The criss-cross tape holds the flowers upright so you don't have a bunch of droopy flowers bumping into each other and moving around.


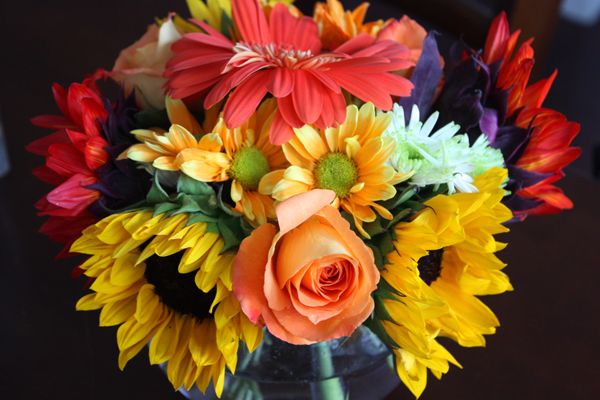
After the large flowers were in, I started to fill in with the next size and worked my way smaller: in this case it was roses, followed by daises, carnations, etc. 


Lastly, I added in all the accent pieces, or fillers: spider mums and whatever those green stemmed things are below. Like I said, I don't know the names of most flowers. I just had to 'google' spider mum. You want to just move pieces around and mess with it a bit until it looks pretty and finished. One thing I would add to the arragement that I did not originally do is find a piece of ribbon that matches the arrangement and tie it around the neck of the vase, covering the ends of the tape so they don't peek through the flowers.


That's it. Honestly. The hardest part was cutting the strips of tape, and to even call that task hard is stretching the truth a bit. If you come across actual florist tape, the time it took me for this project could be cut in half. My grandmother absolutely loved the flowers. She was so pleased with the arrangement and the fact that they lasted almost three weeks that she requested I make her more! 

Here are a few quick shots of the arrangement I made for her last week.
 

18 October 2012

Girl Crush: Carole Radziwill

1

I should start this post by admitting that sometimes I watch trashy tv. Yup, I've been known to catch a few episodes of Kardashians, Giuliana and Bill, Bethenney, and really any season of Housewives. It's my guilty pleasure. I'm not necessarily proud of it, but recently I've found myself catching up on tons of episodes of Real Housewives of NY on demand - not to watch the awkward, catty fights, but to see what Carole Radziwill is wearing. Who is Carole Radziwill? My new girl crush.

Carole can pull off the effortless, chic Jennifer Aniston jeans and leather jacket look paired with the bold, Carrie Bradshaw-esque sense of style and sex appeal - the perfect combination in my opinion and pretty much the look I've been desperately trying to pull off (probably unsuccessfully I'll admit). Who else can wear the lace dress below with what looks like underwear underneath? And she's rocking it flawlessly at 48. Even in just a tank and jeans Carole looks so put together without even trying. I only wish I can look that great at her age. Also, her hair is AMAZING. Seriously, the cut, the color, the style. I have major hair envy. 


2 | 3
4 | 5
6
7 | 8 | 9
10 | 11
11 | 13 | 14

Who is your current girl crush?


17 October 2012

Is It Really Only Wednesday?

 
Sorry for another slow week. Things have been so hectic and busy at work that I fell asleep the same time Lucy went to bed last night and didn't get a chance to prep today's post. I'm also working on a custom painting for a reader that I need finished to ship out this weekend so even my free time is occupied. I'll be sure to step it up for the remainder of the week. Happy hump day! 

15 October 2012

Guest Bathrom - FINISHED!


When I last showed you, the guest bathroom was sort of in limbo. I had painted the walls a soft grey, but kept most of the progress a secret until it was complete (with the exception of two sneak peek projects). 

What started out as window shopping shower curtains at West Elm soon became a full blown room redo. I'm proud to say the room is complete (at least for now). I opted not to tackle painting the countertops just yet. The light fixture could use a replacement, but for now I'm pretty pleased with the end result.

Note: I tried to take as many photos as I could with natural light so you could see the real shade of the paint color, but since there are no windows anywhere near the guest bathroom I eventually had to suck it up and take a few photos using the icky bathroom light. The ones I did take in the natural light have a little blur to them. (Any photographers out there have any tips?)


Let's take a mini tour and share some resources, shall we? In case you were curious, the paint is 'Silver Sateen' by Behr. 

Along with giving the walls a fresh coat of paint, I wanted to replace the ugly beige outlet colors with crisp, clean white ones. I opted for the clean lines and modern look of the flat switch as opposed to the traditional light switch. The replacements cost a little more than the others, but not so much that I felt guilty for the upgrade. This picture also gives you a good idea of the paint color. It wasn't my intention, but in person there seems to be a slight blue tint to the gray, which I'm fine with considering the whole color scheme.
 
 
Octopus hook, Anthropologie | hand towel, West Elm | 'D' dish, West Elm | glass storage jars, Homegoods | light switch & outlet, Home Depot

basket, Homegoods | white linens, Homegoods | sea sponges, Amazon | soaps, Amazon


oar, DIY (here) | metal 'D', Urban Outfitters | matted frame left, Target | matted frame right, Pottery Barn | thick wood frame, Target | metal round frame, Homegoods | painting, painted by my grandfather with DIY frame (here) | white frame, old repainetd white | metal door knocker, Pottery Barn | key, thrift
 
 
shower curtain, West Elm | bathmat, West Elm | yellow metal storage crate, Homegoods (love the little pop of yellow!) | candle, Anthropologie | white towels, wedding gift
 
 
ceramic tray, West Elm | glass, Anthropologie | wooden toothbrushes, Amazon | frame, thrifted | soap, Amazon
 
One of my favorite aspects of this room is the fact that I snuck in a number of items that are sentimental to both Jordan and myself - specifically pictures of our grandparents.
 
 
Left: Jordan's maternal grandparents (Target frame)
Right: Jordan's paternal grandparents (Homegoods frame)
 
 
Left: My maternal grandfather (thrifted frame)
Right: My maternal grandmother (really old frame I painted white)
 
 
Above: My paternal grandparents. (Pottery Barn frame) They are the only grandparents that are still alive. I see them every Sunday morning for brunch.

 
There you have it. The guest bathroom is complete, and I love it.